Redirect Pro for WooCommerceRedirect Pro for WooCommerce
WooCommerce Redirect Plugin: Redirect Users After Purchase with an option to generate temporary links for added functionality.Redirect Pro for WooCommerce
WooCommerce Redirect Plugin: Redirect Users After Purchase with an option to generate temporary l...
Overview
The "Redirect Pro for WooCommerce" plugin is designed to redirect users to a specific link after they have successfully purchased a specified WooCommerce product. It also has the option to generate and append a temporary link to the redirect URL. This plugin is useful for scenarios where you want to provide customers with access to special content or resources after a purchase.
Features
- Post-purchase redirection to specified URLs
- Temporary link generation capability
- Custom dashboard for easy configuration
- Flexible product-specific settings
Requirements
Requires PHP: 7.0+
Requires WordPress: 5.1+
Requires WooCommerce: 6+
Instructions
Redirect Pro for WooCommerce: A User-Friendly Guide
Getting Started
Hey there, Ready to streamline your customer experience after purchase? This guide will walk you through using the Redirect Pro plugin step by step.
Step 1: Install and Activate the Plugin
- Download the plugin zip file
- Go to your WordPress dashboard
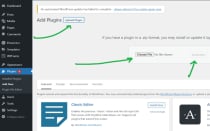
- Navigate to Plugins > Add New > Upload Plugin
- Choose the downloaded zip file
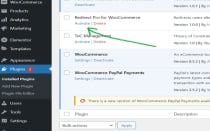
- Click "Install Now" and then "Activate"
Step 2: Access Plugin Settings
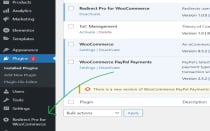
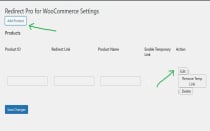
After activation, you'll see a new menu item called "Redirect Pro for WooCommerce" in your WordPress dashboard. Click on it to start configuring your redirects.
Step 3: Adding a New Product Configuration
Want to set up a redirect for a specific product? Here's how:
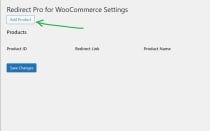
- Click the "Add Product" button
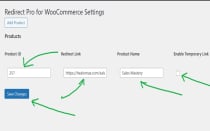
- Fill in these details:
- Product ID: The unique WooCommerce product identifier
- Product Name: A descriptive name for your reference
- Redirect Link: Where customers will go after purchasing
Temporary Link Options
- Generate Temporary Link: Select this on if you want to create a temporary access link
- Important Note: Temporary links work best for internal WordPress pages, not external URLs
Step 4: Configure Redirect Behavior
When to Use Temporary Links
- Perfect for giving customers short-term access to exclusive content
- Links automatically expire after 24 hours
- Ideal for digital products, courses, or special resources
Best Practices
- Double-check your Product ID is correct
- Ensure redirect links are valid
- Test your configuration before going live
Step 5: Managing Your Configurations
Editing a Configuration
- Find the product in the plugin menu
- Click "Edit"
- Make your changes
- Click "Save Changes"
Deleting a Configuration
- Locate the product
- Click "Delete"
- Confirm deletion
- Click "Save Changes"
Common Scenarios & Tips
Scenario 1: Online Course Access
- Set up a redirect to a course welcome page after course purchase
- Use temporary link to provide 24-hour preview access
Scenario 2: Digital Product Delivery
- Redirect customers to a download page immediately after purchase
- Generate a temporary link for limited-time downloads
Handling Caching and 404 Redirection Issues
Potential Challenges with Temporary Links
When using temporary links, you might encounter issues with caching and 404 redirection. Here's what you need to know:
404 Redirection Challenges
- If your website is configured to automatically redirect all 404 errors (missing pages)
- Temporary links might be incorrectly treated as invalid pages
- Users could be automatically redirected to your homepage or a default page
Solving 404 Redirection Issues
To ensure your temporary links work correctly, you have two options:
- Exclude temporary pages from 404 redirection
- Temporarily disable 404 redirection plugins
- Check your 404 plugin's usage instructions
Caching-Related Complications
- Caching can interfere with temporary links
- Cached page versions might show outdated information
- Users could be redirected to incorrect pages
Managing Caching for Temporary Links
To prevent caching issues:
- Exclude temporary link pages from caching
- Example exclusion path: domain.com/sales-page/temporary-link
- Check your specific caching plugin's configuration
Pro Tip: When setting up temporary links, always test thoroughly to ensure smooth user experience!
Recommended Plugin Configuration Steps
- Review your current 404 redirection settings
- Check caching plugin configurations
- Create exceptions for temporary link paths
- Test temporary links in different scenarios
Important: The functionality of generating temporary links is not guaranteed and may require additional configuration depending on your specific WordPress setup.
Troubleshooting Quick Fixes
Redirect Not Working?
- Verify Product ID matches exactly
- Check that redirect URL is correct and accessible
- Ensure WooCommerce is properly configured
Temporary Link Issues
- Confirm "Generate Temporary Link" is enabled
- Make sure link is for an internal WordPress page
- Check that no caching or 404 redirection plugins are interfering
Final Thoughts
This plugin is all about creating smooth, professional customer experiences. Take your time to set it up carefully, and you'll be providing seamless post-purchase journeys in no time!
Pro Tip: Always test your configurations with a test purchase to ensure everything works perfectly!
Other items by this author
| Category | Plugins / WooCommerce |
| First release | 29 November 2024 |
| Last update | 29 November 2024 |
| Supported CMS | WordPress 5.0, WooCommerce 6.x, WordPress 5.8, WordPress 5.9, WooCommerce 7.x, WooCommerce 8.x, WordPress 6.0, WordPress 6.1, WordPress 6.2, WordPress 6.3, WordPress 6.4, WordPress 6.5, WooCommerce 9.x, WordPress 6.6 |
| Files included | .php, .css, .html, Javascript .js |
| Tags | woocommerce, e-commerce, purchase, checkout, sales, redirect, after, redirection, customer experience, woocommerce extension, temporary link, post-purchase, e-commerce optimization, hassle free |


